
Twenty-seven Civil War battles are recorded in Georgia by the National Park Service’s Civil War Sites Advisory Commission. Most were fought in 1864, during William T. Sherman’s Atlanta Campaign and his March to the Sea, but the war came to the coast in 1862 and to Chickamauga in 1863. This guide summarizes every one, with dates, commanders, results and casualty estimates, and tells you which battlefields, forts and markers you can visit today.
- Battles in Georgia27
- FirstFort Pulaski, April 10-11, 1862
- LargestChickamauga, September 18-20, 1863
- LastFort McAllister, December 13, 1864
- Parks to visitChickamauga and Kennesaw Mountain national parks, Fort Pulaski National Monument, Fort McAllister and Resaca state historic sites
All 27 Battles at a Glance
| Date | Battle | County | Result |
|---|---|---|---|
| April 10-11, 1862 | Fort Pulaski | Chatham County | Union victory |
| March 3, 1863 | Fort McAllister (first attack) | Bryan County | Confederate victory |
| September 10-11, 1863 | Davis’ Cross Roads | Dade and Walker counties | Confederate victory |
| September 18-20, 1863 | Chickamauga | Catoosa, Dade and Walker counties | Confederate victory |
| November 27, 1863 | Ringgold Gap | Catoosa County | Confederate victory |
| February 22-27, 1864 | Dalton I | Whitfield County | Confederate victory |
| May 7-13, 1864 | Rocky Face Ridge | Whitfield County | Union victory |
| May 13-15, 1864 | Resaca | Gordon County and Whitfield County | Inconclusive |
| May 17, 1864 | Adairsville | Bartow County | Inconclusive |
| May 25-26, 1864 | New Hope Church | Paulding County | Confederate victory |
| May 26 to June 1, 1864 | Dallas | Paulding County | Union victory |
| May 27, 1864 | Pickett’s Mill | Paulding County | Confederate victory |
| June 9 to July 3, 1864 | Marietta | Cobb County | Union victory |
| June 22, 1864 | Kolb’s Farm | Cobb County | Union victory |
| June 27, 1864 | Kennesaw Mountain | Cobb County | Confederate victory |
| July 20, 1864 | Peachtree Creek | Fulton County | Union victory |
| July 22, 1864 | Atlanta | Fulton and DeKalb counties | Union victory |
| July 28, 1864 | Ezra Church | Fulton County | Union victory |
| August 5-7, 1864 | Utoy Creek | Fulton County | Inconclusive |
| August 14-15, 1864 | Dalton II | Whitfield County | Union victory |
| August 20, 1864 | Lovejoy’s Station | Clayton County | Confederate victory |
| August 31-September 1, 1864 | Jonesboro | Clayton County | Union victory |
| October 5, 1864 | Allatoona | Bartow County | Union victory |
| November 22, 1864 | Griswoldville | Jones County and Twiggs County | Union victory |
| November 28, 1864 | Buck Head Creek | Jenkins County | Confederate victory |
| December 4, 1864 | Waynesboro | Burke County | Union victory |
| December 13, 1864 | Fort McAllister (capture) | Bryan County | Union victory |
Battles linked to their own pages have full guides; the rest are covered in detail below.
1862: Fort Pulaski
Union forces seized the Georgia coast early, and new rifled cannon made short work of brick forts.
Fort Pulaski
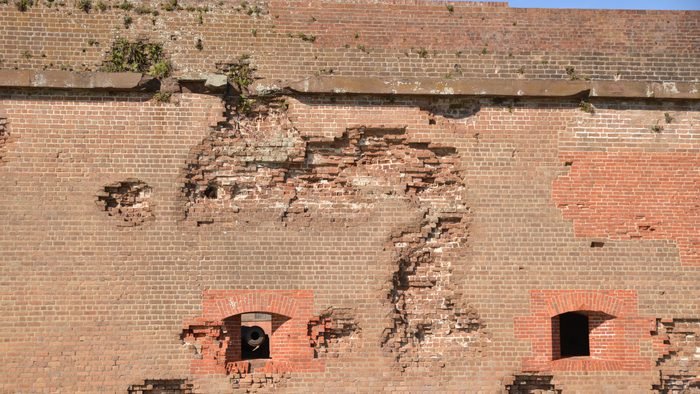
Fort Pulaski, built by the U.S. Army before the war, is located near the mouth of the Savannah River, blocking upriver access to Savannah. Fortifications such as Pulaski, called third system forts, were considered invincible, but the new technology of rifled artillery changed that. On February 19, 1862, Brig. Gen. Thomas W. Sherman ordered Captain Quincy A. Gillmore, an engineer officer, to take charge of the investment force and begin the bombardment and capture of the fort. Gillmore emplaced artillery on the mainland southeast of the fort and began the bombardment on April 10 after Colonel Charles H. Olmstead refused to surrender the fort. Within hours, Gillmore’s rifled artillery had breached the southeast scarp of the fort, and he continued to exploit it. Some of his shells began to damage the traverse shielding the magazine in the northwest bastion. Realizing that if the magazine exploded the fort would be seriously damaged and the garrison would suffer severe casualties, Olmstead surrendered after 2:00 pm on April 11.
- Date: April 10-11, 1862
- County: Chatham County
- Campaign: Operations against Fort Pulaski (1862)
- Commanders: Maj. Gen. David Hunter and Capt. Quincy A. Gillmore [US]; Col. Charles H. Olmstead [CS]
- Forces: The Port Royal Expeditionary Force’s Fort Pulaski investment troops [US]; Fort Pulaski Garrison [CS]
- Estimated casualties: 365 total (US 1; CS 364) (adsbygoogle = window.adsbygoogle || []).push({});
- Result: Union victory
Visiting today: The fall of Fort Pulaski in April 1862 stunned military engineers worldwide: it proved that rifled artillery had made brick fortifications obsolete almost overnight. The fort is preserved today as Fort Pulaski National Monument near Savannah, and the cannon-scarred walls Gillmore's guns breached are still visible to visitors.
1863: Chickamauga and the Fight for Chattanooga
The war reached North Georgia in September 1863, when the Confederate Army of Tennessee won its biggest victory at Chickamauga, then lost Chattanooga that November.
Fort McAllister (first attack)
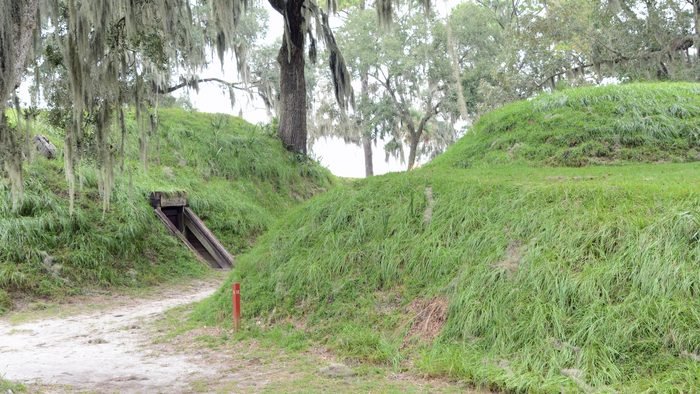
Rear Adm. Samuel F. Du Pont (US) ordered three ironclads, Patapsco, Passaic, and Nahant, to test their guns and mechanical appliances. They also practiced artillery firing by attacking Fort McAllister, then a small three-gun earthwork battery. On March 3, 1863, the three ironclads conducted an eight-hour bombardment. The bombardment did not destroy the battery but did some damage, while the three ironclads received some scratches and dents. The tests were helpful for knowledge and experience gained, but the fort did not fall, showing that the ironclads’ firepower could not destroy an earthen fort.
- Date: March 3, 1863
- County: Bryan County
- Campaign: Naval Attacks on Fort McAllister (1863)
- Commanders: Capt. P. Drayton, U.S.N. [US]; Capt. George A. Anderson [CS]
- Forces: Union Navy Flotilla [US]; Fort McAllister Garrison [CS]
- Estimated casualties: Unknown (adsbygoogle = window.adsbygoogle || []).push({});
- Result: Confederate victory
Visiting today: This first, inconclusive round at Fort McAllister proved that Union ironclads alone couldn't reduce a well-built earthen fort, a lesson the Navy carried into later operations elsewhere on the coast. The fort's earthworks survive today at Fort McAllister State Park near Richmond Hill.
Ringgold Gap
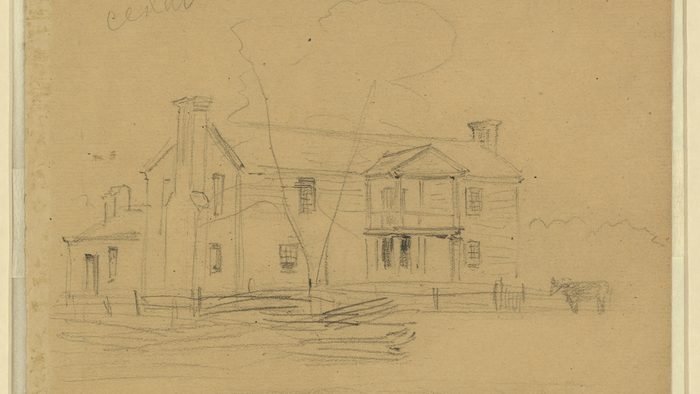
Following the Union victory at Missionary Ridge and the Rebel retreat, Yankee troops set out in pursuit. Maj. Gen. Patrick Cleburne’s command fell back to Ringgold Gap where the Western & Atlantic Railroad passed through Taylor’s Ridge. Maj. Gen. Joseph B. Hooker sent his force forward to seize the ridge, which it failed to do after five hours of heavy fighting.
- Date: November 27, 1863
- County: Catoosa County
- Campaign: Chattanooga-Ringgold Campaign (1863)
- Commanders: Maj. Gen. Joseph Hooker [US]; Maj. Gen. Patrick R. Cleburne [CS]
- Forces: Three divisions [US]; one division [CS]
- Estimated casualties: 912 total (US 432; CS 480) (adsbygoogle = window.adsbygoogle || []).push({});
- Result: Confederate victory
Visiting today: Ringgold's small Depot Park and several historical markers downtown mark the site of Cleburne's rearguard stand, which bought Bragg's retreating army the time it needed to reach safety. The victory earned Patrick Cleburne a rare Confederate Congressional Thanks and cemented his reputation as one of the war's best defensive tacticians.
Full guides for this period: Davis’ Cross Roads (September 10-11, 1863), Chickamauga (September 18-20, 1863).
1864: The Atlanta Campaign
From May to September 1864, Sherman pushed south along the Western & Atlantic Railroad, flanking Confederate positions one after another until Atlanta fell on September 2.
Dalton I
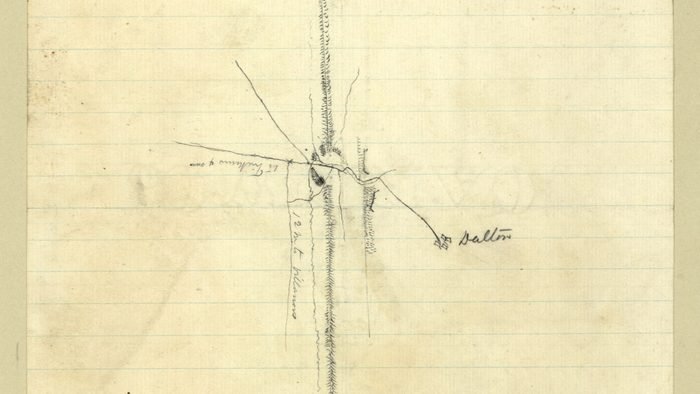
From Vicksburg, Mississippi, Sherman launched a campaign to take the important railroad center at Meridian. And, if the situation was favorable, to push on to Selma and threaten Mobile, in order to prevent the shipment of Confederate men and supplies. To counter the threat, Confederate President Jefferson Davis ordered troops into the area. While these operations unfolded, Thomas determined to probe Gen. Johnston’s army in the hope that Johnston’s loss of two divisions, sent to reinforce Lt. Gen. Leonidas Polk as he withdrew from Meridian to Demopolis, Alabama, would make him vulnerable. Skirmishing and intense fighting occurred throughout the demonstration. At Crow Valley on the 25th, Union troops almost turned the Rebel right flank, but ultimately it held. On the 27th, Thomas’s army withdrew, realizing that Johnston was ready and able to counter any assault.
- Date: February 22-27, 1864
- County: Whitfield County
- Campaign: Demonstration on Dalton (1864)
- Commanders: Maj. Gen. George H. Thomas [US]; Gen. Joseph E. Johnston [CS]
- Forces: Army of the Cumberland [US]; Army of Tennessee [CS]
- Estimated casualties: Unknown (adsbygoogle = window.adsbygoogle || []).push({});
- Result: Confederate victory
Visiting today: This February 1864 demonstration was a probing action rather than a full battle, meant to test Confederate strength before the main Atlanta Campaign opened that spring. Whitfield County carries more Civil War historical markers than any other county in Georgia, and several near Dug Gap and Crow Valley still mark the ground fought over here.
Rocky Face Ridge
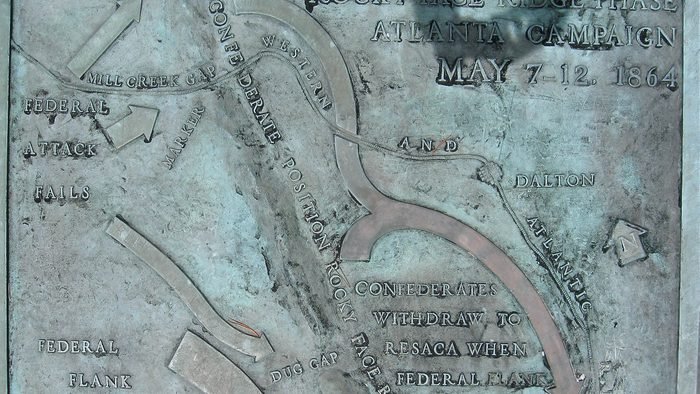
Gen. Joseph E. Johnston had entrenched his army on the long, high mountain of Rocky Face Ridge and eastward across Crow Valley. As Maj. Gen. William T. Sherman approached, he decided to demonstrate against the position with two columns while he sent a third one through Snake Creek Gap, to the right, to hit the Western & Atlantic Railroad at Resaca. The two columns engaged the enemy at Buzzard Roost (Mill Creek Gap) and at Dug Gap. In the meantime, the third column, under Maj. Gen. James Birdseye McPherson, passed through Snake Creek Gap and on the 9th advanced to the outskirts of Resaca where it found Confederates entrenched. Fearing defeat, McPherson pulled his column back to Snake Creek Gap. On the 10th, Sherman decided to take most of his men and join McPherson to take Resaca. Thenext morning, Sherman’ s army withdrew from in front of Rocky Face Ridge. Discovering Sherman’s movement, Johnston retired south towards Resaca on the 12th.
- Date: May 7-13, 1864
- Also called: Combats at Buzzard Roost, Mill Creek, Dug Gap
- County: Whitfield County
- Campaign: Atlanta Campaign (1864)
- Commanders: Maj. Gen. William T. Sherman [US]; Gen. Joseph E. Johnston [CS]
- Forces: Military Division of the Mississippi [US]; Army of Tennessee [CS]
- Estimated casualties: Unknown (adsbygoogle = window.adsbygoogle || []).push({});
- Result: Union victory (Union casualties were high, but they did force the Confederates off Rocky Face Ridge.)
Visiting today: Sherman's flanking move through Snake Creek Gap at Rocky Face Ridge opened the Atlanta Campaign and set the template Sherman would use again and again: threaten a flank rather than attack Johnston's strong defensive lines head-on. A historical marker at Mill Creek Gap, along US 41 north of Dalton, marks part of the battlefield today.
Resaca
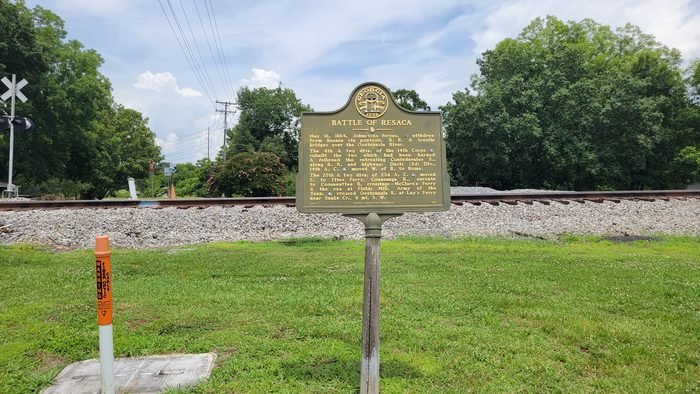
Gen. Joseph E. Johnston had withdrawn from Rocky Face Ridge to the hills around Resaca Georgia. On the 13th, the Union troops tested the Rebel lines to pinpoint their whereabouts. The next day full scale fighting occurred, and the Union troops were generally repulsed except on the Rebel right flank where Sherman did not fully exploit his advantage. On the 15th, the battle continued with no advantage to either side until Sherman sent a force across the Oostanula River, at Lay’s Ferry, towards Johnston’s railroad supply line. Unable to halt this Union movement, Johnston was forced to retire.
- Date: May 13-15, 1864
- County: Gordon County and Whitfield County
- Campaign: Atlanta Campaign (1864)
- Commanders: Maj. Gen. William T. Sherman [US]; Gen. Joseph E. Johnston [CS]
- Forces: Military Division of the Mississippi [US]; Army of Tennessee [CS]
- Estimated casualties: 5,547 total (US 2,747; CS 2,800)
- Result: Inconclusive
Visiting today: Resaca Confederate Cemetery, established shortly after the war by local women, and the Resaca Battlefield State Historic Site preserve parts of the ground fought over here. Though the battle itself was inconclusive, Sherman's flanking move across the Oostanaula River forced Johnston into the pattern of fight-and-withdraw that defined the rest of the campaign.
New Hope Church
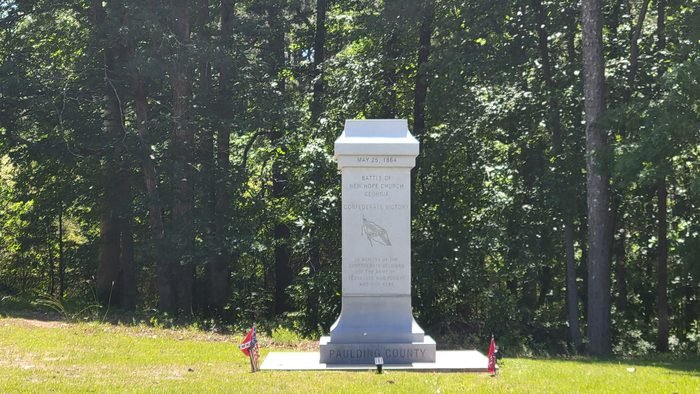
After Johnston retreated to Allatoona Pass on May 19-20, Sherman decided that he would most likely pay dearly for attacking Johnston there. Johnston anticipated Sherman’s move and met the Union forces at New Hope Church. Sherman mistakenly surmised that Johnston had a token force and ordered Maj. Gen. Joseph Hooker’s corps to attack. This corps was severely mauled. On the 26th, both sides en-trenched, and skirmishing continued throughout the day. Actions the next day in this area are discussed under Pickett’s Mills.
- Date: May 25-26, 1864
- County: Paulding County
- Campaign: Atlanta Campaign (1864)
- Commanders: Maj. Gen. William T. Sherman and Maj. Gen. Joseph Hooker [US]; Gen. Joseph E. Johnston [CS]
- Forces: Military Division of the Mississippi [US]; Army of Tennessee [CS]
- Estimated casualties: Total unknown (US 1,600; CS unknown) (adsbygoogle = window.adsbygoogle || []).push({});
- Result: Confederate victory
Visiting today: New Hope Church earned the nickname "the Hell Hole" from soldiers on both sides for the ferocity of the fighting in the thick woods here. A memorial and historical marker stand today near the church's original site in Paulding County, part of the same broad battlefield that includes Pickett's Mill.
Kennesaw Mountain
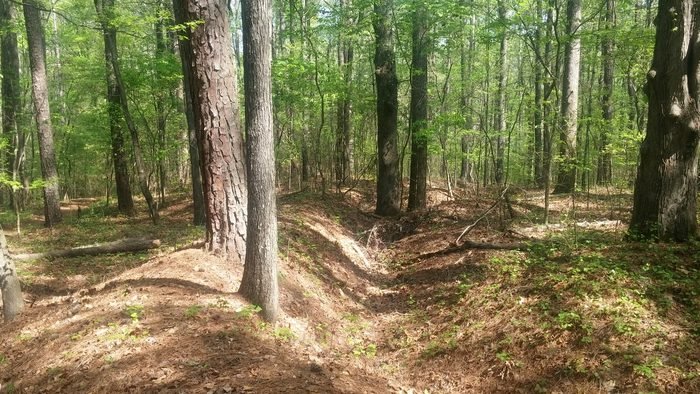
On the night of June 18-19, Gen. Joseph E. Johnston, fearing envelopment, withdrew his army to a new, previously selected position astride Kennesaw Mountain. This entrenched arc-shaped line, to the north and west of Marietta, protected the Western & Atlantic Railroad, the supply link to Atlanta. Having defeated General John B. Hood troops at Kolb’s Farm on the 22nd, Sherman was sure that Johnston had stretched his line too thin and, therefore, decided on a frontal attack with some diversions on the flanks. On the morning of June 27, Sherman sent his troops forward after an artillery bombardment. At first, they made some headway overrunning Confederate pickets south of the Burnt Hickory Road, but attacking an enemy that was dug in was futile. The fighting ended by noon, and Sherman suffered high casualties.
- Date: June 27, 1864
- County: Cobb County
- Campaign: Atlanta Campaign (1864)
- Commanders: Maj. Gen. William T. Sherman [US]; Gen. Joseph E. Johnston [CS]
- Forces: Military Division of the Mississippi [US]; Army of Tennessee [CS]
- Estimated casualties: 4,000 total (US 3,000; CS 1,000) (adsbygoogle = window.adsbygoogle || []).push({});
- Result: Confederate victory
Visiting today: Kennesaw Mountain National Battlefield Park, run by the National Park Service, preserves the mountain and miles of the original entrenchments today, with hiking trails leading up to the summit earthworks and a visitor center near the base. Despite the costly Union defeat here, Sherman's flanking maneuvers soon forced Johnston to abandon the position anyway.
Peachtree Creek
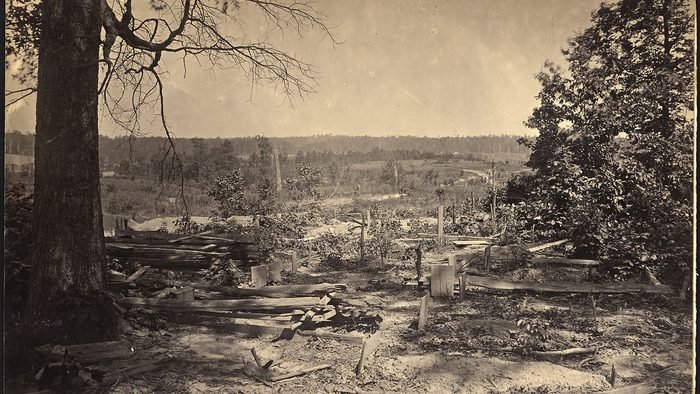
Under Gen. Joseph E. Johnston, the Army of Tennessee had retired south of Peachtree Creek, an east to west flowing stream, about three miles north of Atlanta. Sherman split his army into three columns for the assault on Atlanta with George H. Thomas’s Army of the Cumberland moving from the north. Johnston had decided to attack Thomas, but Confederate President Jefferson Davis relieved him of command and appointed John B. Hood to take his place. Hood attacked Thomas after his army crossed Peachtree Creek. The determined assault threatened to overrun the Union troops at various locations. Ultimately, though, the Yankees held, and the Rebels fell back.
- Date: July 20, 1864
- County: Fulton County
- Campaign: Atlanta Campaign (1864)
- Commanders: Maj. Gen. George H. Thomas [US]; Gen. John B. Hood [CS]
- Forces: Army of the Cumberland [US]; Army of Tennessee [CS]
- Estimated casualties: 6,506 total (US 1,710; CS 4,796) (adsbygoogle = window.adsbygoogle || []).push({});
- Result: Union victory
Visiting today: Peachtree Creek was John Bell Hood's first battle as army commander, launched just three days after he replaced the more cautious Joseph Johnston, and its failure set the tone for the costly attacks that followed at Atlanta and Ezra Church. Tanyard Creek Park in Atlanta's Buckhead neighborhood preserves part of the battlefield today, with interpretive markers along its walking trails.
Ezra Church
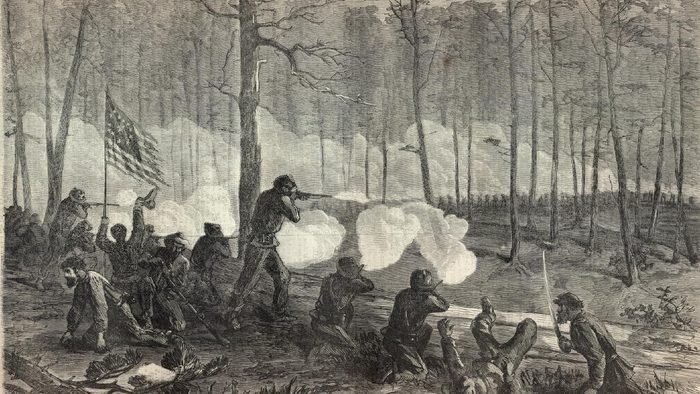
Earlier, Maj. Gen. William T. Sherman's forces had approached Atlanta from the east and north. Hood had not defeated them, but he had kept them away from the city. Sherman now decided to attack from the west. He ordered the Army of the Tennessee, commanded by Maj. Gen. O.O. Howard, to move from the left wing to the right and cut Hood’s last railroad supply line between East Point and Atlanta Georgia. Hood foresaw such a maneuver and determined to send the two corps of Lt. Gen. Stephen D. Lee and Lt. Gen. Alexander P. Stewart to intercept and destroy the Union force. Thus, on the afternoon of July 28, the Rebels assaulted Howard at Ezra Church. Howard had anticipated such a thrust, entrenched one of his corps in the Confederates’ path, and repulsed the determined attack, inflicting numerous casualties. Howard, however, failed to cut the railroad.
- Date: July 28, 1864
- Also called: Battle of the Poor House
- County: Fulton County
- Campaign: Atlanta Campaign (1864)
- Commanders: Maj. Gen. Oliver O. Howard [US]; Gen. John B. Hood [CS]
- Forces: Army of the Tennessee [US]; two corps of Army of Tennessee [CS]
- Estimated casualties: 3,562 total (US 562; CS 3,000) (adsbygoogle = window.adsbygoogle || []).push({});
- Result: Union victory
Visiting today: Ezra Church is remembered today mainly by a Georgia Historical Society marker near the site, since the church itself and much of the battlefield were absorbed into what is now Atlanta's Westview Cemetery and surrounding neighborhoods. It was the third major Confederate attack Hood launched in two weeks trying to break Sherman's siege of Atlanta, and the third to fail.
Utoy Creek
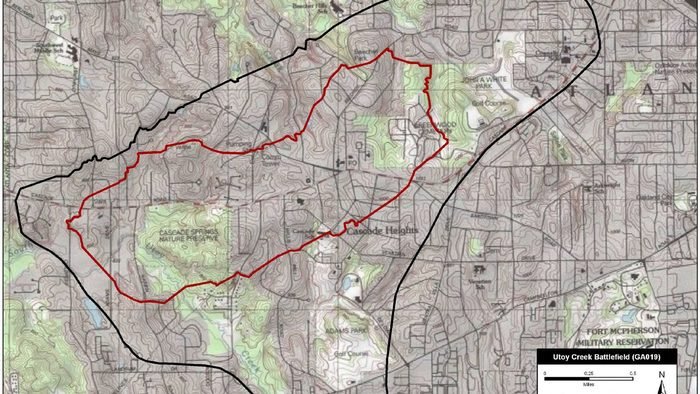
After failing to envelop Hood's left flank at Ezra Church, Sherman still wanted to extend his right flank to hit the railroad between East Point and Atlanta. He transferred John M. Schofield’ s Army of the Ohio from his left to his right flank and sent him to the north bank of Utoy Creek. Although Schofield’s troops were at Utoy Creek on August 2, they, along with the XIV Corps, Army of the Cumberland, did not cross until the 4th. Schofield’s force began its movement to exploit this situation on the morning of the 5th, which was initially successful. Schofield then had to regroup his forces, which took the rest of the day. The delay allowed the Rebels to strengthen their defenses with abatis, which slowed the Union attack when it restarted on the morning of the 6th. The Federals were repulsed with heavy losses by Bate’s Division and failed in an attempt to break the railroad. On the 7th, the Union troops moved toward the Confederate main line and entrenched. Here they remained until late August.
- Date: August 5-7, 1864
- County: Fulton County
- Campaign: Atlanta Campaign (1864)
- Commanders: Maj. Gen. John M. Schofield [US]; Gen. John B. Hood [CS]
- Forces: Army of the Ohio [US]; Army of Tennessee [CS]
- Estimated casualties: Unknown (adsbygoogle = window.adsbygoogle || []).push({});
- Result: Inconclusive
Visiting today: Utoy Creek was one of the last attempts by Sherman to take Atlanta by direct assault before he shifted to cutting off the city's supply lines instead. A historical marker at the Cascade Springs Nature Preserve in southwest Atlanta, dedicated in 2016, now marks the battlefield.
Dalton II
Maj. Gen. Joseph Wheeler and his cavalry raided into North Georgia to destroy railroad tracks and supplies. They approached Dalton in the late afternoon of August 14 and demanded the surrender of the garrison. The Union commander, Col. Bernard Laibolt, refused to surrender and fighting ensued. Greatly outnumbered, the Union garrison retired to fortifications on a hill outside the town where they successfully held out, although the attack continued until after midnight. Skirmishing continued throughout the night. Around 5 am, on the 15th, Wheeler retired and became engaged with relieving infantry and cavalry under Maj. Gen. James B. Steedman’s command. Eventually, Wheeler withdrew. The contending forces’ reports vary greatly in describing the fighting, the casualties, and the amount of track and supplies captured and destroyed. This engagement was inconclusive, but since the Confederates withdrew, it may be termed a Union victory.
- Date: August 14-15, 1864
- County: Whitfield County
- Campaign: Atlanta Campaign (1864)
- Commanders: Maj. Gen. James B. Steedman [US]; Maj. Gen. Joseph Wheeler [CS]
- Forces: District of Etowah [US]; Wheeler’s cavalry force [CS]
- Estimated casualties: Unknown (adsbygoogle = window.adsbygoogle || []).push({});
- Result: Union victory (The Confederates withdrew.)
Visiting today: This second, smaller action came months after the main Atlanta Campaign had moved on, when Confederate cavalry under Joseph Wheeler tried and failed to retake the rail junction at Dalton. The town's rail depot, the actual target of the raid, still stands in downtown Dalton today.
Jonesboro
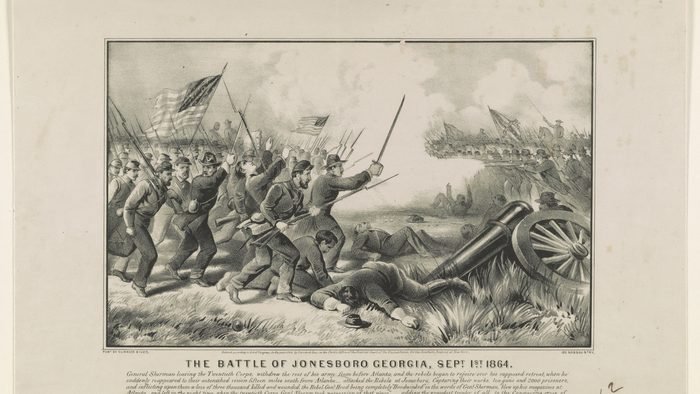
Sherman had successfully cut Hood's supply lines in the past by sending out detachments, but the Confederates quickly repaired the damage. In late August, Sherman determined that if he could cut Hood’s supply lines, the Macon & Western and the Atlanta & West Point Railroads, the Rebels would have to evacuate Atlanta. Sherman, therefore, decided to move six of his seven infantry corps against the supply lines. The army began pulling out of its positions on August 25 to hit the Macon & Western Railroad between Rough and Ready and Jonesborough. To counter the move, Hood sent Lt. Gen. William J. Hardee with two corps to halt and possibly rout the Union troops, not realizing Sherman’s army was there in force. On August 31, Hardee attacked two Union corps west of Jonesborough but was easily repulsed. Fearing an attack on Atlanta, Hood withdrew one corps from Hardee’s force that night. The next day, a Union corps broke through Hardee’ s troops which retreated to Lovejoy’s Station, and on the night of September 1, Hood evacuated Atlanta. Sherman did cut Hood’s supply line but failed to destroy Hardee’s command.
- Date: August 31-September 1, 1864
- County: Clayton County
- Campaign: Atlanta Campaign (1864)
- Commanders: Maj. Gen. William T. Sherman [US]; Lt. Gen. William J. Hardee [CS] Forces Engaged: Six corps [US]; two corps [CS]
- Estimated casualties: 3,149 total (US 1,149; CS 2,000) (adsbygoogle = window.adsbygoogle || []).push({});
- Result: Union victory
Visiting today: The Union victory at Jonesboro cut the last rail line supplying Atlanta and forced Confederate Gen. John Bell Hood to evacuate the city the next night, ending the Atlanta Campaign. The Patrick R. Cleburne Confederate Cemetery and several historical markers in downtown Jonesboro preserve the memory of the battle today.
Full guides for this period: Adairsville (May 17, 1864), Dallas (May 26 to June 1, 1864), Pickett’s Mill (May 27, 1864), Kolb’s Farm (June 22, 1864), Marietta (June 9 to July 3, 1864), Atlanta (July 22, 1864), Lovejoy’s Station (August 20, 1864).
Fall 1864: Hood Strikes North
After losing Atlanta, Gen. John B. Hood moved north against Sherman’s railroad supply line before marching into Tennessee.
Allatoona
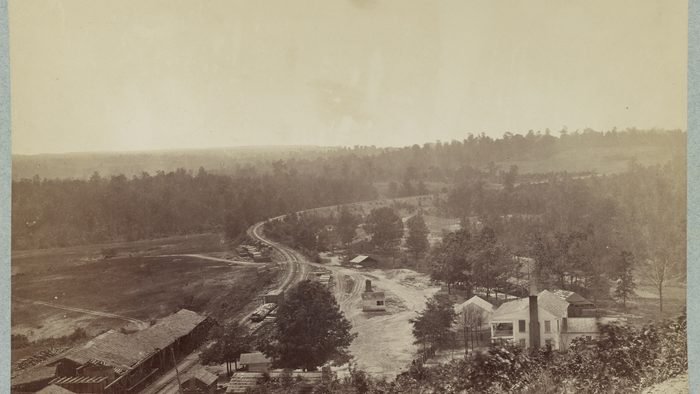
After the fall of Atlanta, Hood moved northward to threaten the Western & Atlantic Railroad, Sherman's supply line. He attacked a number of minor garrisons and damaged track during October 2-4. Sherman sent reinforcements, John M. Corse’s brigade, to Allatoona just before the Rebels attacked there. Maj. Gen. Samuel G. French’s Confederate division arrived near Allatoona at sunrise on the 5th. After demanding a surrender and receiving a negative reply, French attacked. The Union outer line survived a sustained two and a half hour attack, but then fell back and regrouped in an earthen “Star” fort of Allatoona Pass. French repeatedly attacked, but the fort held. The Rebels began to run out of ammunition, and reports of arriving Union reinforcements influenced them to move off and rejoin Hood’s force.
- Date: October 5, 1864
- County: Bartow County
- Campaign: Franklin-Nashville Campaign (1864)
- Commanders: Brig. Gen. John M. Corse [US]; Maj. Gen. Samuel G. French [CS]
- Forces: One brigade (1,944 men) [US]; one division (approx. 2,000 men) [CS]
- Estimated casualties: 1,505 total (US 706; CS 799)
- Result: Union victory
Visiting today: The battlefield is preserved today as part of the Corps of Engineers' Allatoona Pass Trailhead, where visitors can still walk the cut through Allatoona Mountain and see the earthen Star Fort that held against repeated Confederate assaults. The signal message relayed to the Union garrison, "hold the fort, I am coming," later inspired a popular 19th-century hymn.
November and December 1864: The March to the Sea
Sherman cut loose from his supply lines and marched about 60,000 men across Georgia to Savannah, which surrendered on December 21, 1864.
Griswoldville
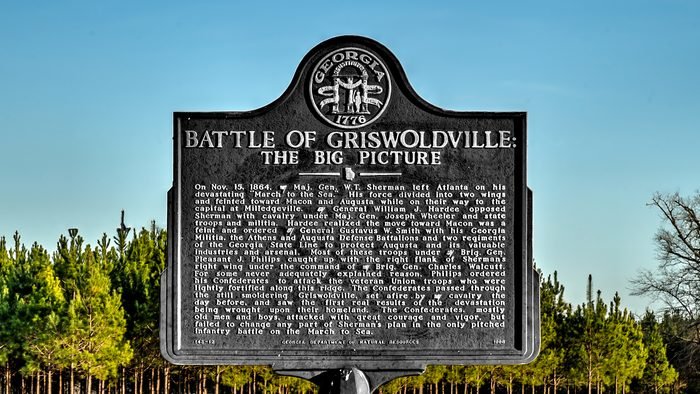
Brig. Gen. Charles Walcutt was ordered to make a demonstration, with the six infantry regiments and one battery. He set out on the morning of November 22, and after a short march he ran into some of Maj. Gen. Joseph Wheeler’s cavalry and drove them beyond Griswoldville. Having accomplished his mission, Walcutt retired to a position at Duncan’s Farm and fortified it with logs and rails to meet an expected Rebel attack force composed of three brigades of Georgia State Militia. The Georgia Militia had been ordered from Macon to Augusta, thinking the latter was Sherman’s next objective, and accidentally collided with Walcutt’s force. The Union force withstood three determined charges before receiving reinforcements of one regiment of infantry and two regiments of cavalry. The Rebels did not attack again and soon retired.
- Date: November 22, 1864
- County: Jones County and Twiggs County
- Campaign: Savannah Campaign (1864)
- Commanders: Brig. Gen. Charles C. Walcutt [US]; Brig. Gen. Pleasant J. Philips and Maj. Gen. Joseph Wheeler [CS]
- Forces: 2nd Brigade, 1st Division, XV Corps, Army of the Tennessee and two regiments of cavalry [US]; 1st Division Georgia Militia and Cavalry Corps, Department of South Carolina, Georgia, and Florida [CS]
- Estimated casualties: 712 total (US 62; CS 650) (adsbygoogle = window.adsbygoogle || []).push({});
- Result: Union victory
Visiting today: Griswoldville was the only real pitched infantry battle of Sherman's March to the Sea, and a tragic one: most of the Confederate force were old men and boys of the Georgia Militia, attacking veteran Union troops with predictable results. A state historical marker and a small preserved section of the battlefield mark the site in Jones County today.
Waynesboro
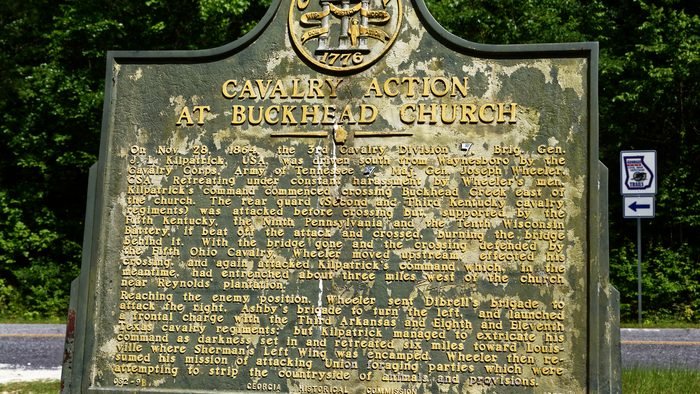
As Sherman's infantry marched southeast through Georgia, his cavalry under Brig. Gen. Judson Kilpatrick rode northeastward. He set out on the morning of December 4 to attack Waynesborough and destroy Joseph Wheeler’s cavalry command. That morning Kilpatrick’s men advanced, driving the Rebel skirmishers in front of them. The Union force then came up against a defensive line of barricades which they eventually overran. As the Union advance continued, they met more barricades which required time to overcome. Finally, the Confederates fell back to a final line of barricades within the town. After furious fighting, the Union troops broke through and Wheeler’s force ran.
- Date: December 4, 1864
- County: Burke County
- Campaign: Savannah Campaign (1864)
- Commanders: Brig. Gen. H. Judson Kilpatrick [US]; Maj. Gen. Joseph Wheeler [CS]
- Forces: 3rd Cavalry Division, Military Division of the Mississippi [US]; Cavalry Command, Army of Tennessee [CS]
- Estimated casualties: 440 total (US 190; CS 250) (adsbygoogle = window.adsbygoogle || []).push({});
- Result: Union victory
Visiting today: The Union victory at Waynesboro drove off Wheeler's cavalry and opened the road for Sherman's armies to converge on Savannah, the final objective of the March to the Sea. Georgia Historical Society markers in Waynesboro and near Buckhead Church in neighboring Jenkins County trace the cavalry's path today.
Fort McAllister (capture)
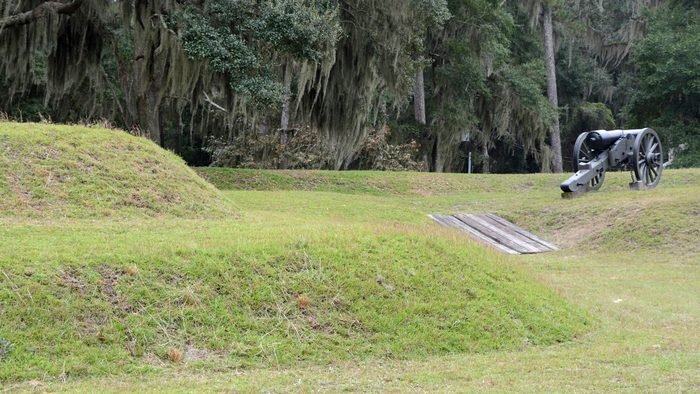
As Sherman's troops approached Savannah they sorely required supplies. Sherman determined that if he could take Fort McAllister, supply ships could reach him. Thus, he ordered Maj. Gen. O.O. Howard, commander of his right wing, to take the fort. Howard chose Brig. Gen. William B. Hazen to accomplish the task. Hazen, in the afternoon of December 13, had his men in line for the attack. Upon giving the order to attack, his men rushed forward through the various obstacles prepared for them, entered the fort, and captured it. With his supply line open, Sherman could now prepare for the siege and capture of Savannah.
- Date: December 13, 1864
- County: Bryan County
- Campaign: Savannah Campaign (1864)
- Commanders: Brig. Gen. William B. Hazen [US]; Maj. George A. Anderson [CS]
- Forces: 2nd Division, XV Corps, Army of the Tennessee [US]; Fort McAllister Garrison (120 men) [CS]
- Estimated casualties: 205 total (US 134; CS 71) (adsbygoogle = window.adsbygoogle || []).push({});
- Result: Union victory
Visiting today: Capturing Fort McAllister in December 1864 opened a supply line to Sherman's army and effectively sealed Savannah's fate, leading to the city's surrender less than two weeks later. The fort's earthworks and the ditch its attackers crossed are preserved today at Fort McAllister State Park, one of the best-preserved Confederate earthworks in the South.
Full guides for this period: Buck Head Creek (November 28, 1864).
Planning a Civil War Trip
The biggest preserved battlefields are Chickamauga and Chattanooga National Military Park and Kennesaw Mountain National Battlefield Park. On the coast, Fort Pulaski National Monument near Tybee Island and Fort McAllister State Park near Richmond Hill show how forts fared against Union guns and infantry. Pair them with our Georgia Civil War sites itinerary, the Georgia Civil War sites directory, Pickett’s Mill Battlefield and Tunnel Hill.
Sources we checked
Facts in this guide were checked in October 2026 against the agencies and operators that run these places:
- National Park Service: Civil War Sites Advisory Commission battle summaries (Georgia)
- National Park Service: Fort Pulaski National Monument
- National Park Service: Kennesaw Mountain National Battlefield Park
- Georgia State Parks: Fort McAllister State Park
- New Georgia Encyclopedia: Civil War in Georgia
Spot something out of date? Email Contact@n-georgia.com and we’ll check it against the official source. Read how we research our guides.